Knife Instructions
Study the two different grips carefully. With correct usage, the Wyoming Knife is much safer than an ordinary knife. Remember, when cutting the hide, ALWAYS KEEP THE SKIN TAUT AND KEEP THE PULL RINGS PARALLEL WITH THE HIDE! Experts disagree as to the best method of field dressing. We believe results are more important than the method. However, we also believe the following procedure to be the best.
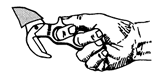
Ripping, gutting and skinning grip.
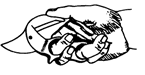
Skinning, caping, scalping
and all purpose grip.

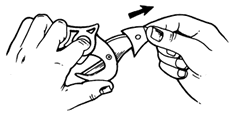
Proper grip for removal and replacement of the blade guard.
Notice that the blade guard is always pulled off and returned to blade away from the body. Keep blade guard on skinning blade when skinning blade
is not being used.

Be sure that blade cover is on skinning blade before inserting knife into case. Flex sheath and start knife into sheath as shown above. It will slide naturally into proper position. To remove knife from sheath; insert index finger into first pull ring and while flexing sheath, remove knife carefully.
Field Dressing

- Prop carcass belly up – use timber or rocks.
- Slit the hide from throat to pelvis (from base of sternum to pelvis if head is to be mounted). Make an incision just THROUGH THE HIDE AND UNDER ONE LAYER OF MEMBRANE and insert point under hide. HOLD HIDE TAUT and pull toward pelvis
(See Figure 1). Curve cut around the genitals or udder. Form an inverted V by cutting down hind leg to join the belly cut. Skin flap of skin back cutting genitals loose as necessary. Start at first joint and make slits down inside of legs. Notice left hand
holds skin taut in figure 2. - Use skinning blade and ripping blade alternately to skin back several inches of hide while rolling hide over itself to keep the carcass clean (See Figure 2). At this point, entire hide can be removed; leaving the carcass on the clean inner hide – or hide can be left on if necessary. Keep in mind that the hide comes off easily when the body is warm. Tests have shown that unskinned animals retain body heat for hours even in cool weather. Animal heat spoils meat and the hide holds the heat. It should be noted that many game animals have been running and are excited when killed. Meat that has been in a feverish condition is difficult to chill properly.
- Cut through pelvis with a saw – preferably with head downhill to lessen the chance
of cutting viscera. - Open carcass by making an incision at the base of the sternum through the belly wall. Insert point into incision (See Figure 1) and pull quickly toward pelvis; keeping pull rings parallel with the animal’s body.
- Cut through brisket with a saw. While holding windpipe with left hand, hook point of knife under windpipe and esophagus, and cut free. Pull down – cutting liver and diaphragm free as necessary and pull viscera out over pelvis. Quarter and hang to chill.
Caping
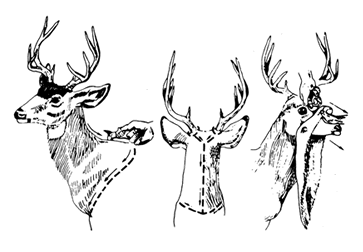
Make a small deep incision under hide and through two layers of membrane between antlers and at base of skull. Insert point; HOLD HIDE TAUT, and rip down spine to top of shoulder, then down side of front quarter to front of breast (See diagram on left).
ALWAYS PULL HIDE TAUT WITH LEFT HAND. Using a prying tool or heavy screwdriver
to loosen skin from antlers; then use skinning blade to finish skinning down face
(See diagram on right). Remove all flesh and fat from ears and hide. Slit lips by cutting between outer skin and inner lining of mouth- Rub salt into scalp and roll up.
Repeat salting in 12 hours. After 48 hours; salt and roll up, flesh side out. Saw off top of skull with antlers through center of eyes.
Cleaning Fish
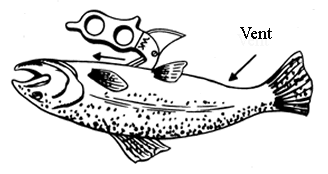
Hold fish, belly up, with left hand. Insert point into the vent. Pull up and toward head ripping the belly wall. Remove entrails and then use handle extension to rub out blood vein.
Blade-Changing Procedure
- Remove blade guard.
- Remove screw.
- PULL BLADE STRAIGHT OUT USING PLIERS.
- CAUTION: When replacing blade, do not over-tighten screw.
- Reverse procedure when replacing blade.
Saw I Instructions
The bone blade should be loaded in the saw frame with the teeth toward the rear – this makes sawing smoother and easier.
DO NOT OVERTIGHTEN – Tightening the wing nut excessively is unnecessary, and could cause excessive wear on the parts. Turn wing nut only until the blade is taut.
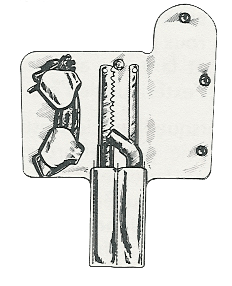
Procedure for replacing saw in the case:
- Blades should be loaded in case first with teeth facing inward.
- To avoid contact with sharp edges, bend the blades back when removing or replacing the bar and tube in the case.
- The stainless steel tube is inserted on top of one blade.
- The front bar is inserted on top of the other blade with the bend of the bar
towards the inside. - The handle is then placed in the leather rings with the bolt assembly on top, and the finger guard toward the outside of the case.
Saw II Instructions
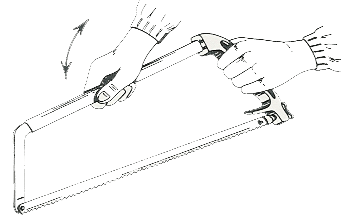
ASSEMBLY PROCEDURE
Place tube with connector in the handle first, as shown in the drawing.

Wing nut should be unscrewed until threads are not showing. Then install blade over front pin and apply pressure (as illustrated) to flex frame and load blade. Then tighten wing nut to desired tension.
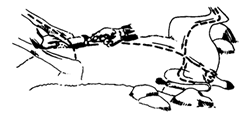
Extraordinary pressure may be exerted on the frame by over-tightening the wing nut. Should you over tighten the wing nut and the saw frame pulls slightly to the left or right, it may be realigned by using light pressure as illustrated above.
This will center the fittings, which are of necessity oversized, to allow rapid assembly and disassembly.